引言
上一节我们讲了自定义 View,接下来就要说说和他差不多的自定义 ViewGroup。两个实现的方法名差不多,比如他们的构造方法,比如同样需要去测量,布局,自定义属性,所以就不再重复说明这些,不如写一个 demo 吧。
View 与 ViewGroup 的不同点总结
- 测量:ViewGroup 作为一个容器,他需要去测量子 View 的宽高,打包成他们的期望
- 布局:ViewGroup 要去覆写 onLayout,去布局孩子,调用孩子 layout 方法,指定孩子上下左右的位置
- 绘制 ViewGroup 一般不绘制自己
重写的方法
generateLayoutParams
@Override
protected LayoutParams generateLayoutParams(LayoutParams p) {
    return super.generateLayoutParams(p);
}
但是我还是想把他放在第一个说,因为在这里有一个非常重要的概念,那就是 LayoutParams !
大家不妨去回忆下,我们假如在一个 RelativeLayout 布局里面添加 View,这个View就可以定义 android:layout_toXXXOf,android:layout_alignXX...这些属性,同样在 LinearLayout 中的子 View 就会带有 android:layout_weight 这个属性。 如果大家去看他们的源码,会发现其内部定义了 LinearLayout.LayoutParams,在此类中,你可以发现你所使用的属性的身影。
onMeasure
ViewGroup的onMeasure的方法与View的方式是有区别的,他需要去管理子View,其中一点就是负责子View的显示大小。
@Override
protected void onMeasure(int widthMeasureSpec, int heightMeasureSpec) {
    super.onMeasure(widthMeasureSpec, heightMeasureSpec);
    int childCount = getChildCount();       //获取子View的数量
    //使用遍历的方式通知子View对自身进行测量
    for (int i=0;i<childCount;i++){
        View childView = getChildAt(i);
        measureChild(childView,widthMeasureSpec,heightMeasureSpec);
    }
}
onLayout
当我们在绘制自定义ViewGroup的时候,我们必须重写他的onLayout,就是用来管理子View显示的位置。
@Override
protected void onLayout(boolean b, int l, int i1, int i2, int i3) {
    //初始化一些变量
    int count = getChildCount();
    int width = 0;
    int height = 0;
    MarginLayoutParams params = null;

    //循环子View,并定义他们的位置
    for (int i = 0; i < count; i++){
        View childView = getChildAt(i);
        width = childView.getMeasuredWidth();
        height = childView.getMeasuredHeight();
        params = (MarginLayoutParams) getLayoutParams();

        switch (i){
            case 0:     //第一个组件
                l = params.leftMargin;
                i1 = getHeight() - height - params.bottomMargin;
                break;
            case 1:     //第二个组件
                l = getWidth() - width - params.leftMargin - params.rightMargin;
                i1 = getHeight() - height - params.bottomMargin;
                break;
        }
        i2 = l + width;
        i3 = height + i1;
        //调用子View的layout,就是上篇自定义View说的layout方法
        childView.layout(l, i1, i2, i3);
    }
}
代码是不是非常好理解,我们在最后神奇的发现,原来就是ViewGroup去主动调用View的layout方法,来决定他的位置。这就是容器与组件的区别。
接下来我们在布局中去使用我们的自定义ViewGroup,我们来看下布局与效果。
<?xml version="1.0" encoding="utf-8"?>
<com.xlh.demo.MyViewGroup xmlns:android="http://schemas.android.com/apk/res/android"
    android:layout_width="match_parent"
    android:layout_height="match_parent">

    <TextView
        android:background="@color/colorAccent"
        android:layout_width="100dp"
        android:layout_height="100dp"/>

    <TextView
        android:background="@color/colorPrimary"
        android:layout_width="100dp"
        android:layout_height="100dp" />

</com.example.xlh.demo.MyViewGroup>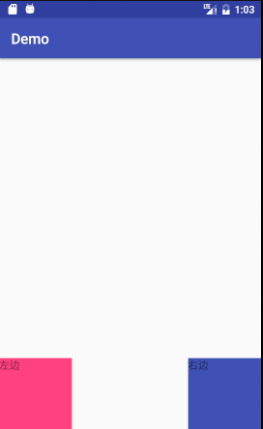
我们的自定义ViewGroup算是有个基本的认识了,更多的学习需要在实际项目在去使用,拆轮子。但是博主并不想这么快的结束这篇文章,太草率会对不起广大读者的,不妨做个小案例把!
先看效果图

接下来就直接上代码,不是很难
public class CustomScrollView extends ViewGroup {

    private int mScreenHeight;
    private int mStartY;
    private int mEnd;
    private Scroller mScroller;
    private int mLastY;
    private int childCount;
    public CustomScrollView(Context context) {
        this(context,null);
    }

    public CustomScrollView(Context context, AttributeSet attrs) {
        super(context,attrs);

        //初始化一些需要的属性
        WindowManager wm= (WindowManager) getContext().getSystemService(Context.WINDOW_SERVICE);
        mScreenHeight=wm.getDefaultDisplay().getHeight();
        mScroller = new Scroller(getContext());
    }

    //在onMeasure中测量子view
    @Override
    protected void onMeasure(int widthMeasureSpec, int heightMeasureSpec) {
        super.onMeasure(widthMeasureSpec, heightMeasureSpec);
        int childCount = getChildCount();
        for (int i=0;i<childCount;i++){
            View childView = getChildAt(i);
            measureChild(childView,widthMeasureSpec,heightMeasureSpec);
        }
    }

    //确定子View的位子
    @Override
    protected void onLayout(boolean changed, int l, int t, int r, int b) {
        childCount = getChildCount();
        //设置这个ViewGroup的高度
        MarginLayoutParams lp = (MarginLayoutParams) getLayoutParams();
        lp.height=mScreenHeight * childCount;
        setLayoutParams(lp);
        //绘制子view的位置
        for (int i = 0; i< childCount; i++){
            View childView = getChildAt(i);
            if(childView.getVisibility()!=View.GONE){
                childView.layout(l,i*mScreenHeight,r,(i+1)*mScreenHeight);
            }
        }

    }

    //step3:增添我们需要的触摸响应事件
    @Override
    public boolean onTouchEvent(MotionEvent event) {
        //在这个触摸事件中,需要判断两个距离,一个是手指移动的距离一个是view滚动的距离
        //这是随着手指的移动会发送改变的量
        int y = (int) event.getY();
        switch (event.getAction()){
            case MotionEvent.ACTION_DOWN:
                mLastY = y;
                mStartY = getScrollY();

                break;
            case MotionEvent.ACTION_MOVE:
                //当我们再次触碰屏幕时,如果之前的滚动动画还没有停止,我们也让他立即停止
                if(!mScroller.isFinished()){
                    mScroller.abortAnimation();
                }
                int dY= mLastY -y;
                //滚动触碰到上边缘时一给个下拉反弹的效果
                if(getScrollY()<0){
                   dY/=3;
                }
                //判断滚动的
                if(getScrollY()>mScreenHeight*getChildCount()-mScreenHeight){
                    dY=0;
                }
                //让我们的view滚动相应的dy距离
                scrollBy(0,dY);
                mLastY=y;
                break;
            case MotionEvent.ACTION_UP:
                mEnd = getScrollY();
                int dScrollY = mEnd - mStartY;
                if(dScrollY>0){//向上滚动的情况
                    if(getScrollY()<0){
                        mScroller.startScroll(0,getScrollY(),0,-dScrollY);
                    }else{
                        if (dScrollY<mScreenHeight/3){
                            mScroller.startScroll(0,getScrollY(),0,-dScrollY);
                        }else{
                            mScroller.startScroll(0,getScrollY(),0,mScreenHeight-dScrollY);
                        }
                    }
                }else{//向下滚动的情况
                    if(getScrollY()>mScreenHeight*getChildCount()-mScreenHeight){
                        mScroller.startScroll(0,getScrollY(),0,-dScrollY);
                    }else{
                        if(-dScrollY<mScreenHeight/3){
                            mScroller.startScroll(0,getScrollY(),0,-dScrollY);
                        }else {
                            mScroller.startScroll(0, getScrollY(), 0, -mScreenHeight - dScrollY);
                        }
                    }
                }
                break;
        }
        //重绘界面
        postInvalidate();
        return true;
    }

    //控制滑屏控制
    @Override
    public void computeScroll() {
        super.computeScroll();
        if(mScroller.computeScrollOffset()){
            scrollTo(0,mScroller.getCurrY());
            postInvalidate();
        }
    }
}
布局文件
<?xml version="1.0" encoding="utf-8"?>
<com.timen4.ronnny.customscrollview.widget.CustomScrollView xmlns:android="http://schemas.android.com/apk/res/android"
    xmlns:tools="http://schemas.android.com/tools"
    android:id="@+id/main"
    android:layout_width="match_parent"
    android:layout_height="match_parent"
    tools:context="com.timen4.ronnny.customscrollview.MainActivity">

    <View
        android:background="#ff0000"
        android:layout_width="wrap_content"
        android:layout_height="wrap_content"/>
    <View
        android:background="#0000ff"
        android:layout_width="wrap_content"
        android:layout_height="wrap_content"/>
    <View
        android:background="#ffff00"
        android:layout_width="wrap_content"
        android:layout_height="wrap_content"/>

    <View
        android:background="#00ff00"
        android:layout_width="wrap_content"
        android:layout_height="wrap_content"/>

</com.timen4.ronnny.customscrollview.widget.CustomScrollView>